Cosplay journey: Ayesha Altugle
For photos from the shoot click here!
Ohayou~ ( ິ•ᆺ⃘• )ິฅ✧
Here is the also long overdue cosplay journey so I'll get straight into it hehe ^^

And Ayesha:

And lol I can't believe that I went with the much more difficult Ayesha orz. (Worth it tho :3)
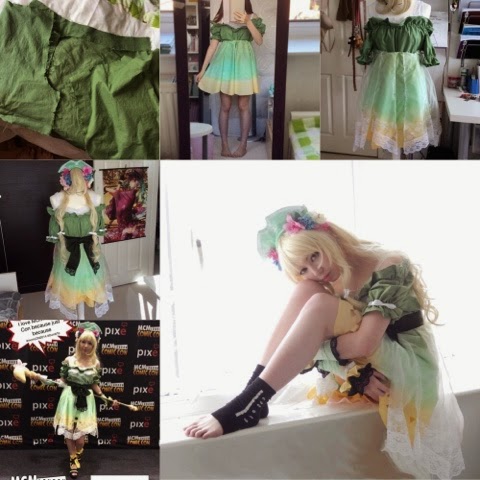
Anyways, so officially began the cosplay in admist of the holidays, and practically worked on it EVERYDAY XD, my goal was to finish just the costume before school started and finish the entire thing for London Comic Con :3. Heh, so material buying came first and foremost...I would not like to tell you what the overall cost was... .______. It went over £100 and I'm just going to leave it there ( ̄▽ ̄)
Moving on, the whole dyeing process took a while but not hard to do,

I was also doing sample pieces, yup, just didn't want to mess it up you see, I calculated the ratios for the dye and water to get the right colour. First off, the top didn't come out the green I wanted, it was waaay to light for my liking, so, I had to dye it again and then came out like this:

Then came the sewing. A hella lot of sewing plus increased difficulty.

So here the top has been finished along with the shap of the skirt. Since I followed a pattern for the top, it wasn't too much of a problem. I had to make my own pattern for the skirt tho. (The camisole was bought and sized down btw)


Made the belt and ribbon, then the ribbon was sewn on the belt, the overlay was then sewn onto the belt as well.


 So the headband was ordered from cosplayfu.com and I was really not happy with the sewing and craftsmanship of it. The seams were not nicely done and the pattern of the headband wasn't really the right shape. £14 odd wasn't really worth the price! Plus it came with the unwanted flowers (I already knew about this though), so I was severely disappointed and will probably NEVER buy from there again :( *ahem* anyways, removed the original flowers and glue gunned the ones I wanted on ^^...And then this arm band wasn't too hard...but the sewing skills here really isn't great hehe ^^;; after that though, the ankle things wasn't too hard to make and tada! The costume completed(≧∇≦)
All in the time of about a month-ish? Other than the camisole, headband and shoes being bought, everything was practically handmade :3
Oh yup, and the staff:


Btw was happy that people took pictures of my work (´◠ω◠`) glad hard work pays off ;-;/ appreciated all that wanted photos of me at the Con TAT/!

Then it wasn't till the new year that I had the photoshoot hehe~...

(Makeup was a little better?)


So I'm just going to end this long post with these 2 photos ★~(◠‿◕✿)
Thank you for reading and I'm looking forward to making my next cosplay hehe (੭ु ˃̶͈̀ ω ˂̶͈́)੭ु⁾⁾
(P.s If you have any questions about how I made some parts of the costume I'll be more than happy to help ^^~)


Heya~! Just came across your blog while looking for references. Your Ayesha's amazing and I can't believe this was only your second cosplay. I'm very interested in cosplaying Ayesha (adult, Shallie Plus version - she's GORGEOUS) at some point in the near future.
ReplyDeleteI'm pretty new to cosplay myself, only having done so once last year, so I've got two questions:
1) How did you cut the triangles alone the hemline and how do you so to keep the fabric from fraying?
2) How did you do the gradient dyeing?
Oops, my bad, turns out you already have a tutorial on cutting holes in fabric, so scratch question (1)! ^_^
DeleteFirstly thank you! Have fun cosplaying Ayesha in the future~
DeleteAs for the gradient dyeing, I basically had a pot of yellow and green dye, dipped the top of the section of fabric into the dye,and slowly submerged the fabric into the dye at timed intervals until it reached the point where I wanted the green dye to come in. I did the same with the green dye.
Hope that helps ^^!
Thanks a bunch~! I oughta try that out sometime ^^
Delete